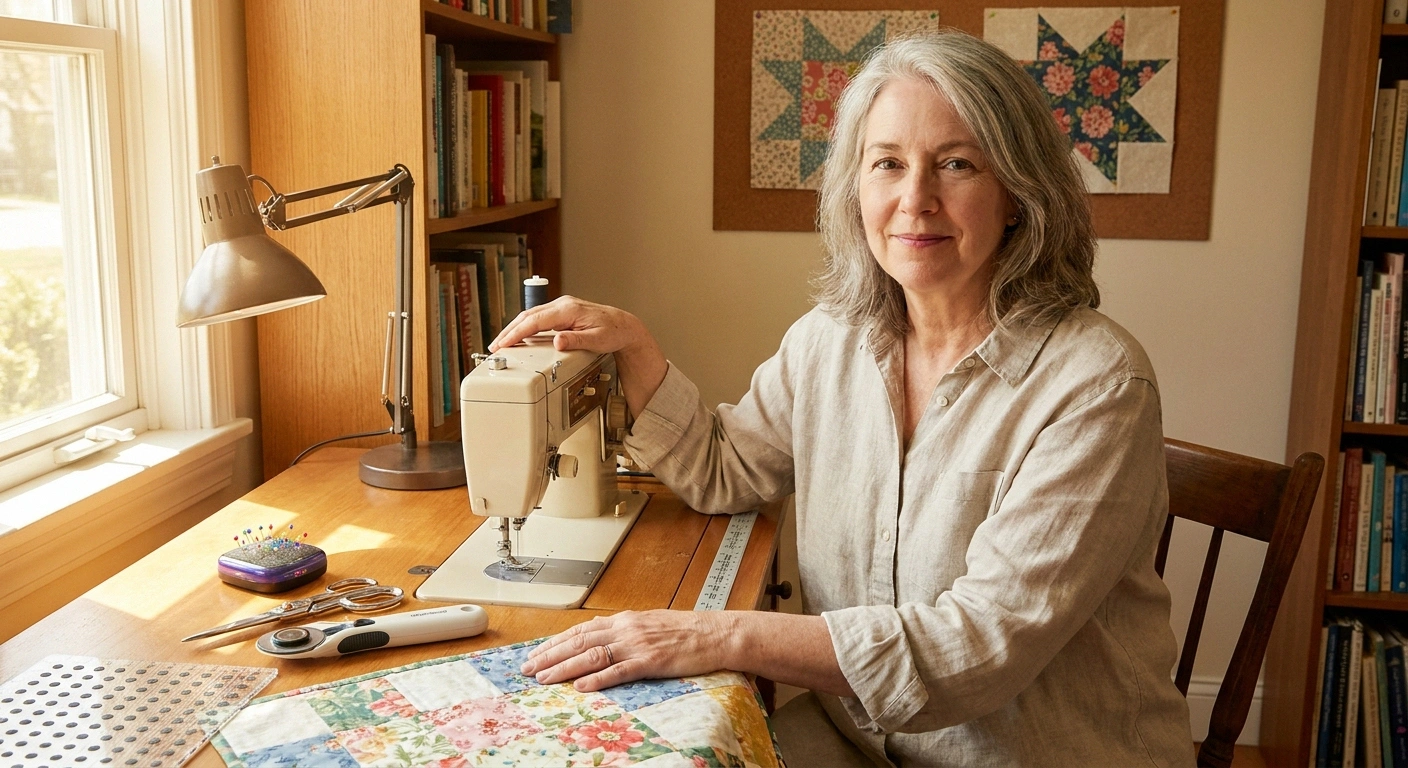
Pull up a chair. I want to talk to you the way I’d talk to a friend who showed up at my sewing table with the same worry I had five years ago: my hands aren’t what they used to be, and I’m scared I’m going to have to give this up.
You don’t have to. What you have to do is change a few things about how you sew, what you sew with, and the rhythm of a sewing afternoon. I’ve been quilting through neuropathy in my own hands for a while now, and the honest truth is my quilts are better than they were before, because I stopped rushing. This is everything I wish someone had told me the first year — the tools that changed my table, the setup that saved my neck, and the safety rules I follow every time I pick up a rotary cutter with fingers I can’t fully feel.
Why Sewing and Quilting Are Actually Good for Neuropathy Hands (in Moderation)
Something surprised me when my occupational therapist said it: gentle, purposeful hand use is one of the better things you can do for peripheral neuropathy in the hands. Not marathon eight-hour sessions. Not white-knuckling a rotary cutter through six layers of denim. But steady, mindful, low-load movement across a lot of different joints and finger positions — which is exactly what sewing and quilting are.
Threading, pinning, guiding fabric, pressing seams, cutting shapes — these are dozens of small, varied motions that keep circulation moving and joints mobile. Compare that to sitting on the couch scrolling with your thumb for two hours. Different worlds.
The other reason to keep going is emotional. Neuropathy takes a lot from us, and losing things we love takes something else that’s harder to name. The mental-health toll of chronic nerve pain is real, and I’ve watched it lift in myself and in the women in my quilt guild when we sit down to a project we care about. Your hobby is medicine of a different kind. Don’t talk yourself out of it.
“Moderation” is the whole ball game. What used to be a five-hour session is now two ninety-minute sessions with a break between. That’s not failure. That’s the adaptation.
Setting Up Your Sewing Space for Numb Fingers
Before tools, the room itself. Most of the hand pain I used to have at the end of a sewing day was actually shoulder, neck, and lower-back pain radiating down and making the numbness worse. Fix the room, and half your hand problems get quieter on their own.
The chair and the table
Your sewing table should hit at elbow height when you’re sitting relaxed with your shoulders down — twenty-eight to thirty inches for most of us. Too high, and your shoulders climb toward your ears and stay there. Too low, and your wrists bend down over the machine at an angle that pinches the nerves running into your fingers.
The chair matters more than any tool on this list. Firm lumbar support, feet flat on the floor, knees at ninety degrees, adjustable enough to raise and lower as you switch between machine and cutting table. A used office chair beats a folding chair by a mile.
Light. Then more light.
An LED task lamp with an adjustable arm is not a nice-to-have. Eye strain becomes tension in the shoulders becomes tension in the hands. Position the lamp twelve to eighteen inches from your work, angled from the side so your hand doesn’t cast a shadow. A cool-white LED reads truest to fabric color. If you can, add a second lamp over the cutting table — rotary-cutter accidents happen in shadows.
Key Takeaway
You don’t have to give up sewing or quilting because your hands have gone numb. You have to change three things: the tools you use, the way your space is set up, and the rhythm of a sewing session.
Ergonomic swaps, an LED task lamp, a safety-lock rotary cutter, magnetic pin discipline, an auto-shutoff iron, and a 15-minutes-on / 5-off pacing rhythm keep the hobby safe and the flares away.
The floor and the foot pedal
An anti-fatigue mat under your chair, or a small area rug with rubber non-slip backing taped to the floor, matters for two reasons. If you have neuropathy that affects your balance, a shifting rug is a fall waiting to happen when you stand up. And when your feet aren’t hunting for stable ground, the foot pedal stays where it belongs.
Put a piece of rubber shelf liner or a non-slip pedal pad under your foot pedal. A pedal that skates half an inch every time you press it will surprise you at the worst moment, and neuropathy feet don’t always feel the pedal escaping until it’s gone.
Reachable tools, not stretched-for tools
Set your table so scissors, thread, seam ripper, and pin cushion are all within an easy elbow’s reach without twisting. Every twist is a chance to knock the rotary cutter off the table. Everything else lives in bins across the room where you have to get up — which is a feature, not a bug, because standing up every twenty minutes is exactly the pacing you want.
The Tools That Change Everything
Here are the tool swaps that made the biggest difference at my table. None of these are expensive fixes, and you can add them one at a time as you find what your hands actually need.
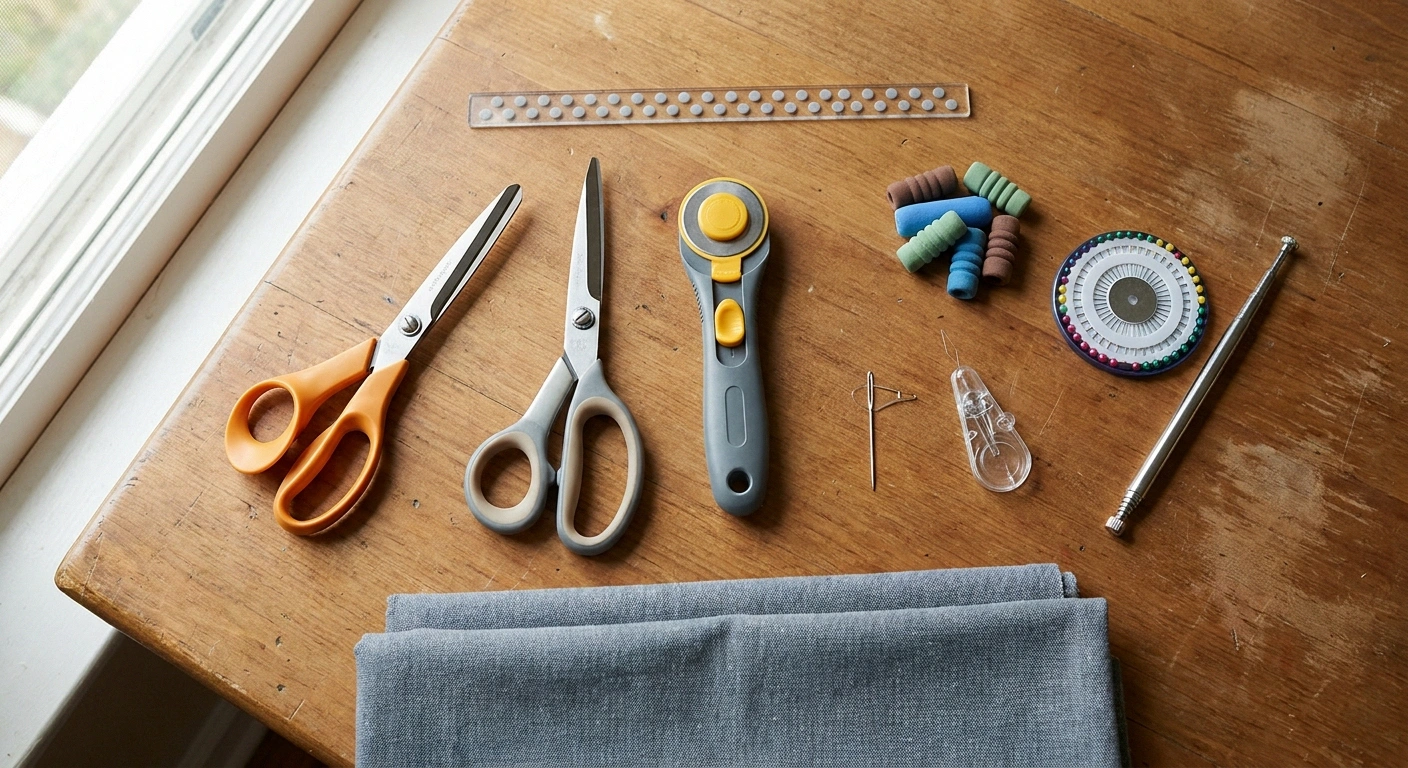
Standard Tool → Neuropathy-Friendly Swap
| Standard Tool | Neuropathy-Friendly Swap | Why It Helps |
|---|---|---|
| Standard finger-hole scissors | Spring-loaded / squeeze-grip scissors | Blades open on their own; hand only closes |
| Push-slide rotary cutter | Auto-lock or squeeze-to-open rotary cutter | Blade closes the instant grip relaxes |
| Standard eye-of-needle hand sewing | Self-threading (V-slot) needles + threader | No fingertip precision needed |
| Small-head pins in a pincushion | Flat flower-head pins + magnetic pincushion + wand | Easy to grip; no crawling after dropped pins |
| Thin-handled seam ripper / marker | Same tool with a foam or silicone grip added | Whole-hand grip beats fingertip pinch |
| Any iron | Auto-shutoff iron with ceramic soleplate | Prevents burn accidents numb fingers can’t feel in time |
| Overhead room light only | Adjustable LED task lamp + magnifying lamp | Cuts eye strain that feeds hand tension |
| Plain acrylic ruler | Ruler with non-slip grip dots + raised edge | No shift under fingers you can’t fully feel |
Neuropathy-Friendly Tool Checklist
Print this and check off as you swap. You don’t need everything at once.
- ✓ Spring-loaded or squeeze-grip scissors (retire the finger-hole pair)
- ✓ Bent-handle dressmaker shears for flat cuts
- ✓ Rotary cutter with safety lock / squeeze-to-open blade
- ✓ Cut-resistant glove for the ruler hand
- ✓ Self-threading hand needles + mechanical needle threader
- ✓ Foam or silicone grips on all thin-handled tools
- ✓ Magnetic pin cushion + telescoping pickup wand
- ✓ Large-headed flat flower pins
- ✓ Non-slip grip dots on every acrylic ruler
- ✓ Self-healing cutting mat, 24″x36″ or larger
- ✓ Auto-shutoff iron with ceramic soleplate
- ✓ Adjustable LED task lamp (12-18″ from work)
- ✓ Magnifying LED lamp for close threading work
- ✓ Fingerless compression gloves
- ✓ Anti-fatigue floor mat or non-slip area rug
Scissors that don’t fight you
Get rid of any pair with tight metal finger holes. Replace them with spring-loaded scissors — the blades open on their own after each cut, so your hand only has to close, not open and close. Some brands use a squeeze grip instead of finger holes, which is a game-changer if your knuckles are stiff or swollen.
Bent-handle dressmaker shears also help: the angled handle lets the blade lay flat on the table so you can cut without lifting your wrist. Whichever style you land on, keep them sharp — a sharp blade cuts on its own weight; a dull one makes your fingers do the work.
An ergonomic rotary cutter — with a safety lock
This is the single most important tool in this article. Get a rotary cutter with a squeeze-to-open blade or a manual safety lock that engages the moment you release the handle. The old-style push-slide cutters have hurt more quilters than every other tool combined, and numb fingertips make them dangerous in a specific way — you don’t feel the moment your thumb slips off the safety.
A 45mm blade is the workhorse; a 28mm for curves. Change the blade the moment it starts skipping a thread — dull blades require more pressure, and more pressure is when accidents happen.
Self-threading needles and a good threader
Self-threading hand needles have a small V-slot above the eye. You lay the thread over the top and pull it down into the slot — your fingertips never have to feel the thread through the eye. Trade-off: the thread can pop out if you tug hard, so keep motions gentle. For machine work, a mechanical needle threader (or one built into newer machines) does the same job.
Foam grip aids for anything thin
Silicone or foam pencil grips fit right over the handle of a seam ripper, a marking pencil, or a stiletto. They cost about a dollar apiece and let you grip the tool with your whole hand instead of pinching it between two fingertips you can barely feel. Buy a bag of ten and put them on every thin-handled tool at your table.
A magnetic pin cushion and a magnetic pickup wand
A magnetic pin cushion holds pins upright by their heads, so you grab the fat end and don’t fish for the point with fingers that can’t tell the difference. When you inevitably drop pins on the floor, a telescoping magnetic pickup wand collects them without you bending down or crawling on a floor where a stray pin can end up in a numb foot. Use pins with large glass or plastic heads — flat flower-head pins are excellent because they lay flat under a ruler.
Non-slip rulers and mats
Put non-slip grip dots or a strip of grip tape on the back of every acrylic ruler you own. A ruler that shifts a millimeter while you’re cutting is how the blade jumps the edge. Your self-healing cutting mat should be big enough that you don’t have to reposition mid-cut — a 24×36 is a good all-purpose size, and you’ll cut more safely on it than on a 12×18 where the fabric hangs off.
Handling Rotary Cutters, Pins, and Hot Irons With Numb Hands
Honest talk here. The three most common ways sewers hurt themselves are things you can lose the feedback from when your fingertips are numb: a rotary blade slipping past a ruler, a pin working into skin you don’t feel, and an iron sitting on a wrist for two seconds too long. Here’s the safety layer I run every time.
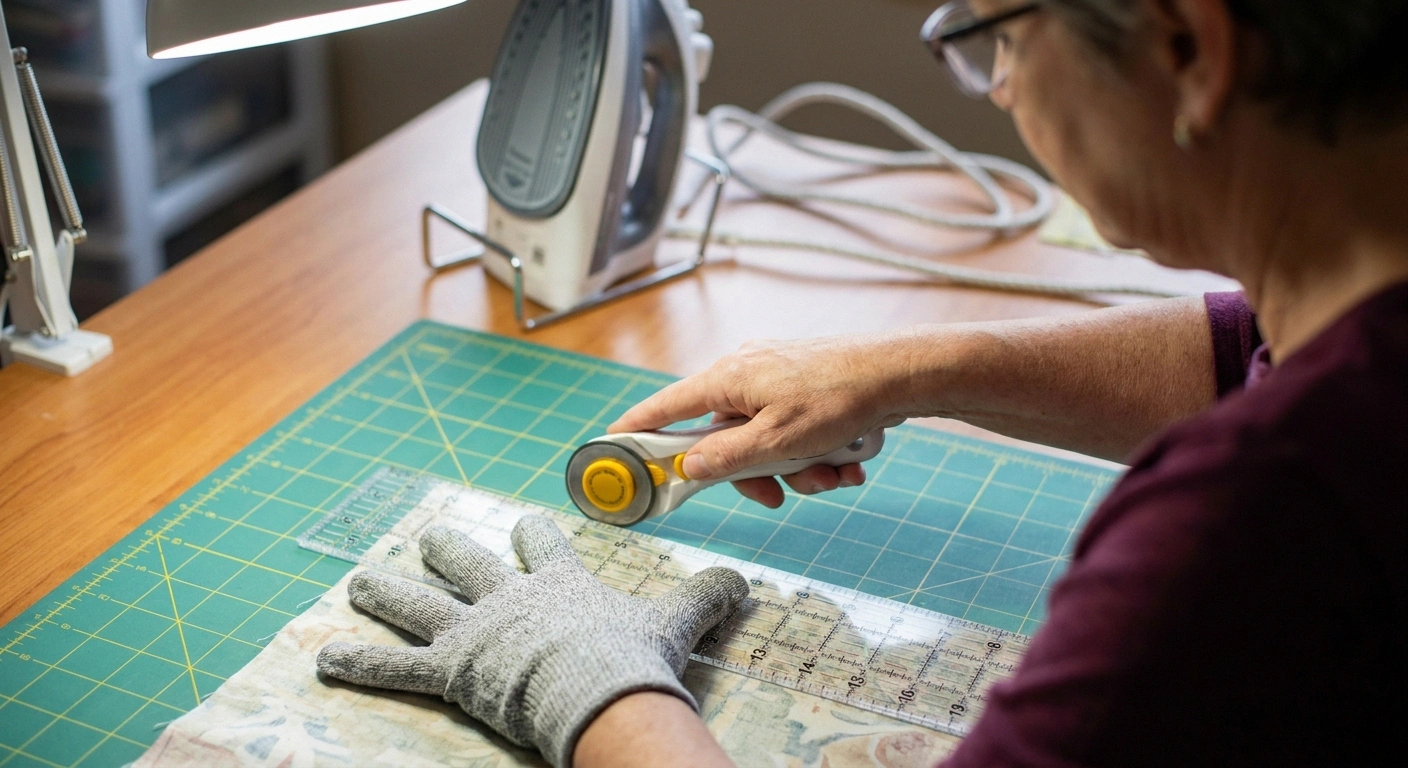
Numb-Finger Safety Rules (Non-Negotiable)
Numb fingertips don’t give you the pain signal in time. These three rules cover the three tools that can hurt you fastest:
- Rotary cutter: Close/lock the blade BEFORE you release the handle. Every single time. No exceptions.
- Iron: Auto-shutoff model required. Iron rest upright between every press. Never test heat with a fingertip.
- Machine needle: Pull every pin before it reaches the presser foot. Guide fabric with the flat of the hand, fingers 2-3 inches back from the needle.
If you have a near-miss, stop for the day. One is enough.
Rotary cutter rules I never break
- Blade closed before I let go. Every single release. Not “after I set it down.” Before.
- Ruler-hand fingers behind the ruler edge by at least an inch. Spread your hand wide, thumb tucked, and don’t let a fingertip hang over.
- One motion, away from the body. Push the blade away from you in a single confident cut. No sawing back and forth.
- Stand up for long cuts. Sitting puts your body in a weak position for a straight cut. Standing gives you shoulder-over-blade alignment.
- Change the blade at the first skipped thread. A dull blade needs pressure. Pressure is where accidents live.
- Cut-resistant glove on the ruler hand. Kevlar-blend gloves designed for kitchen work fit fine and add a real margin.
Pin discipline
Pull every pin out before it goes under the presser foot. I know some sewers stitch over pins — I did too. Numb fingers change the math: a broken machine needle can send a piece of metal at your face, and you may not feel the pin bend until the needle strikes it. Pin, sew up to the pin, pull it, keep going. Becomes automatic in a week. And keep a magnet on the ironing board and the floor near your machine to catch pins that get away.
The iron: the rule I actually tape to the wall
An iron is where numb fingertips can hurt you badly and fast. Three rules:
- Auto-shutoff, non-negotiable. If your iron does not shut itself off after eight to ten minutes of inactivity, replace it. This one purchase is the cheapest safety upgrade in the room.
- Iron rest, always upright. Never lay a hot iron flat between presses. Between every press, back on the rest, upright. Even if you’re only stepping away for two seconds.
- Never test heat with a finger. Ever. If your fingertips don’t feel a burn until three seconds in, the burn is already a blister. Test heat by holding your hand six inches above the soleplate and feeling the radiant heat, or by pressing a scrap first.
If you can, get an iron with a ceramic soleplate and a cool-touch handle. Some newer models beep or vibrate when they’re hot enough to press — that’s a real feature for numb-hand sewers.
Pacing and Preventing Hand Fatigue
Here’s the rhythm I settled into after a lot of trial and error: fifteen minutes of focused work, five minutes off. Two rounds of that, then a full ten-minute stand-up-and-walk-away break. Some days I go three rounds of that before I take a longer break, some days I only get two. The point is you don’t try to sew for an hour straight, ever.
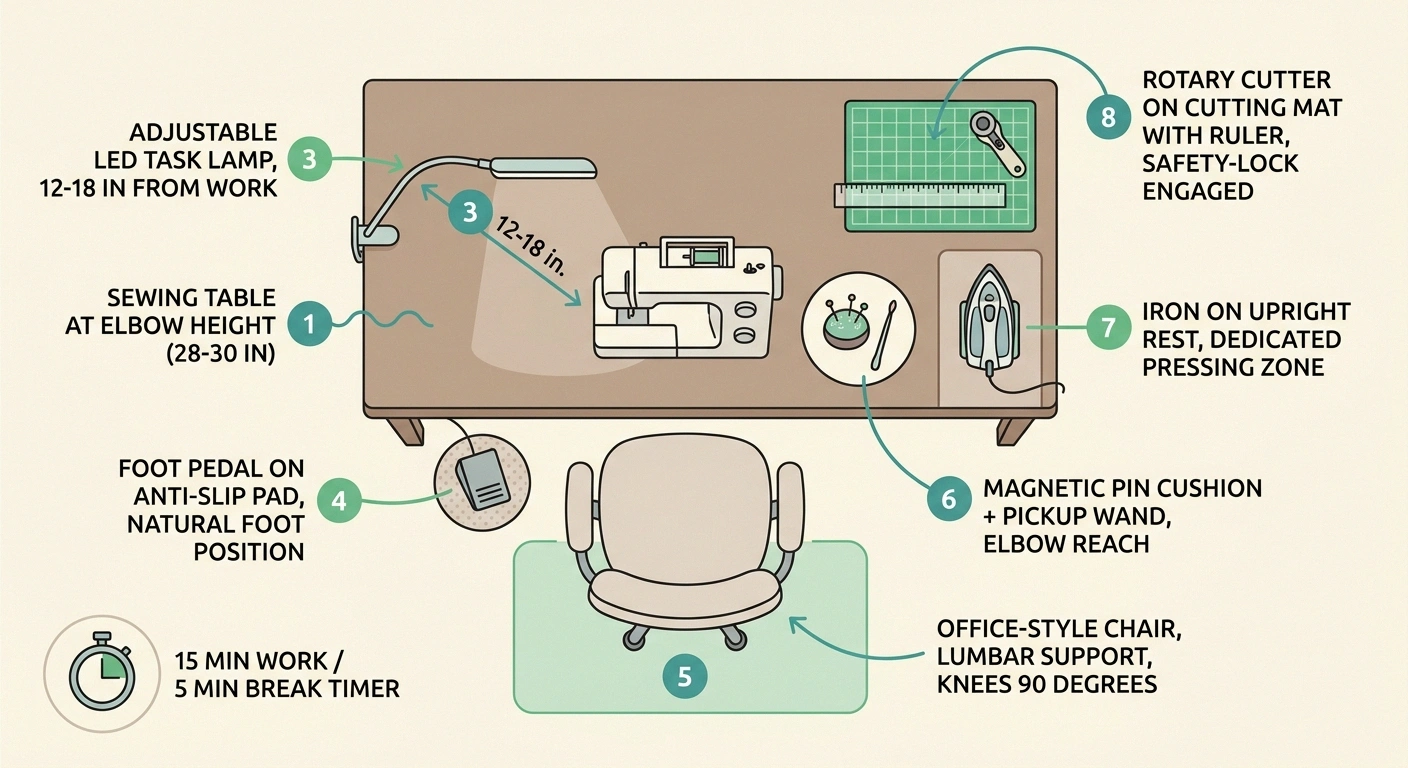
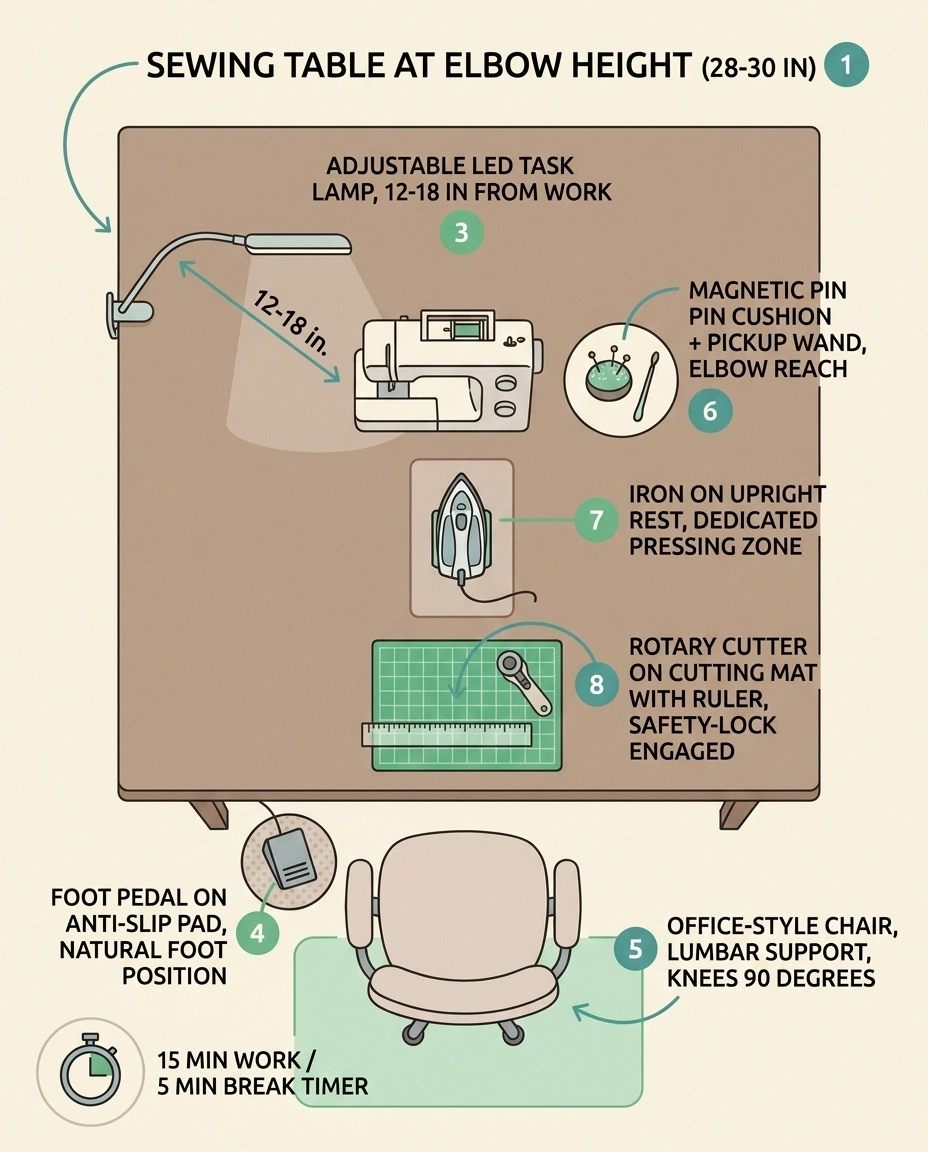
The 15 / 5 Sewing Rhythm
During the five-minute breaks I stretch my hands. Nothing fancy — slow fist opens and closes, wrist rolls both directions, thumb circles, and a gentle prayer-position stretch. If those motions are new to you, our hand-and-body exercise guide is a fine starting point.
Warmth is a tool
Cold hands are stiff hands, and stiff hands drop rotary cutters. I keep a rice-filled hand warmer next to the microwave and heat it thirty seconds between sessions. I also wear fingerless compression gloves when I sew, especially fall and winter. Gentle compression calms nerve chatter and keeps circulation moving, and the fingerless design leaves my fingertips free for guiding fabric.
Working With Feet Comfortably at the Sewing Machine
If neuropathy affects your feet too, the machine’s foot pedal is its own small challenge. Numb feet don’t always feel light pedal pressure, so you go from zero to fast without a middle gear. Here’s what helps.
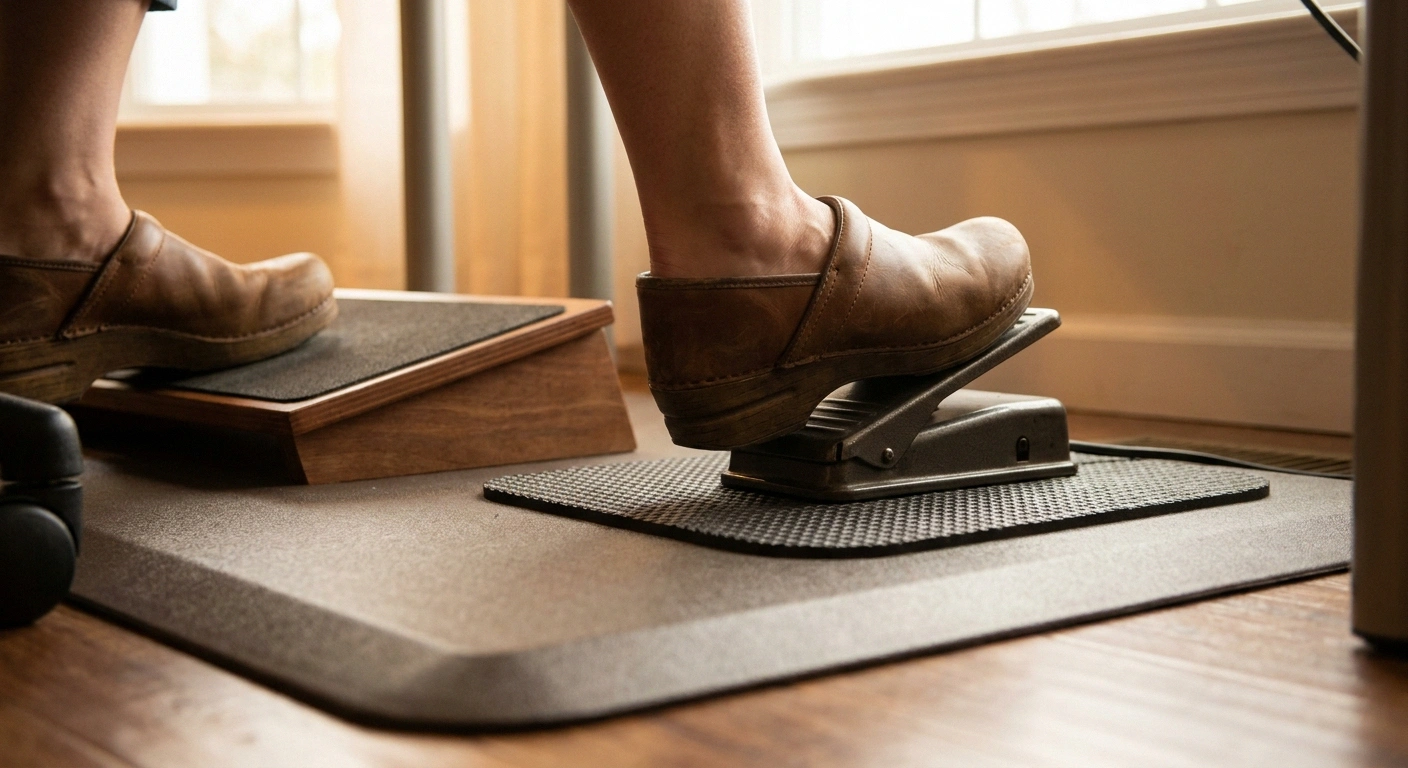
Put the pedal exactly where your foot naturally lands. Not to the left, not tucked back — right where your foot goes. A small anti-slip pad under it keeps it there.
Wear closed-toe shoes with a firm sole in the sewing room. Not slippers, not bare feet. A dropped pin, a dropped rotary cutter, a hot-iron catastrophe — all of these need real shoes between them and your foot. Same standard as the rest of your daily foot-care routine.
If your non-pedal foot tires or cramps from sitting flat, a small under-desk footrest for that foot changes the whole session. And if your machine lets you cap max pedal speed in the software, use it — a numb-foot lurch can’t run the machine away from you.
Threading a Needle, Reading a Pattern, Marking Fabric When Vision and Touch Both Struggle
Neuropathy tends to arrive around the same season of life that our eyes are also asking for more help. The two combined make close-up work harder than either would alone. Some ways I’ve adapted.
Magnifiers, not squinting
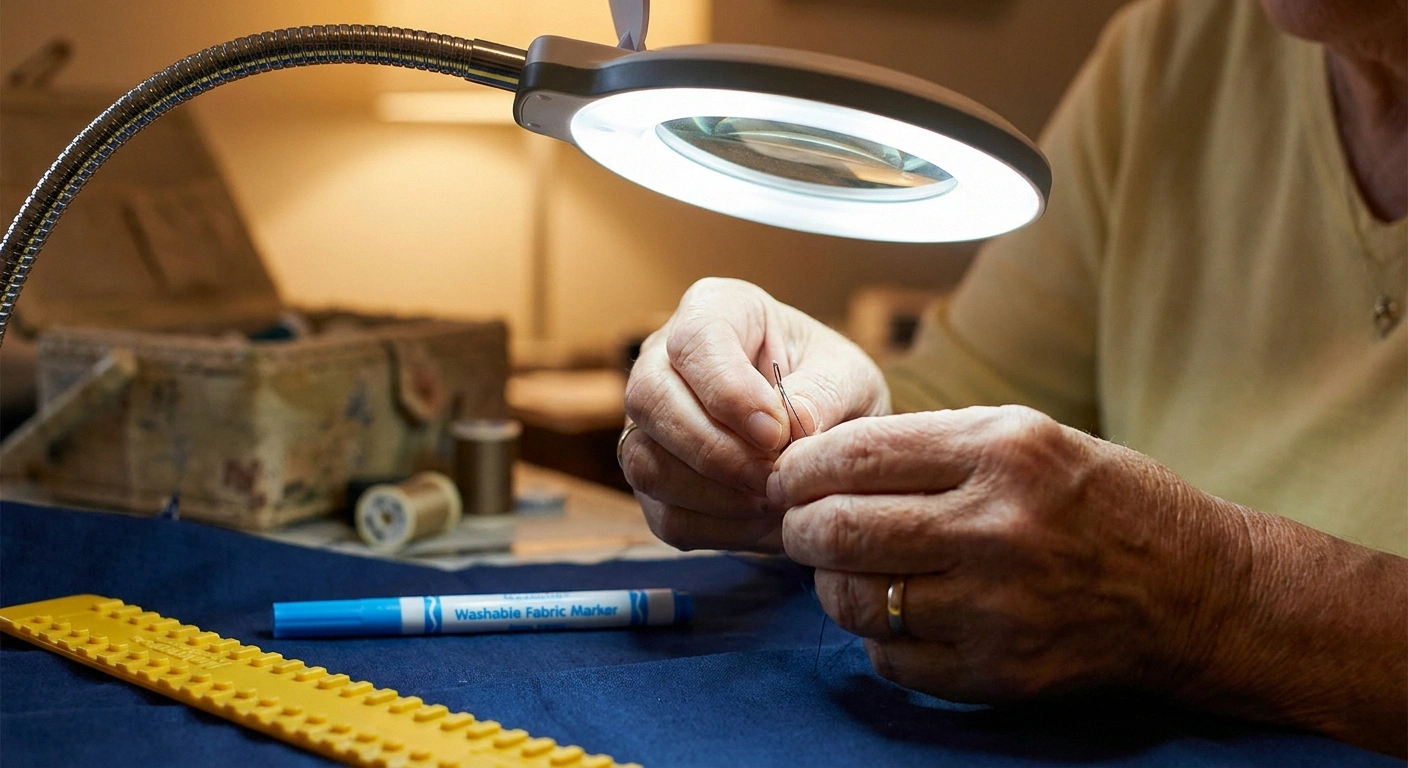
A magnifying LED lamp on a flexible arm — the kind with a lens around 1.75x — pays for itself in a month of easier sessions. Position it over the throat plate of the machine when you’re threading or pin-basting. Around the cutting table, a handheld magnifier or a pair of clip-on lens attachments for your glasses does the same job.
Contrast is your friend
Choose fabric-marking pens or chalk in whatever color contrasts most with what you’re cutting — high-contrast marks are easier to see and easier to line up under a ruler. White chalk on dark fabric. A blue washable pen on light. Skip the gray-on-gray subtle marks that were fine ten years ago; they’re not fine now, and there’s no medal for reading a mark you can barely see.
Tactile ruler edges
Rulers with a raised or textured edge give you touch feedback along the line, which helps when your fingertips are the ones that used to tell you “yes, the ruler is butted up against the fold.” Add-on raised guides that stick onto plain acrylic rulers do the same job. Same idea as putting a rubber band around a slippery pill bottle — you’re adding a texture your hand can find without looking.
When to Stop for the Day (and How to Notice)
This is the section I most want you to actually take to heart. Sewers with neuropathy hurt ourselves not because we don’t feel pain — we do — but because we override it. We tell ourselves “one more block, one more seam, I’m on a roll.” And then the next day is a lost day. Here are the signals I’ve learned to respect.
- Burning across the top of the hand or up the forearm. That’s your signal to close the machine down within five minutes.
- Fingers curling on their own when you try to relax them. The muscles are done.
- Numbness deepening or spreading past its usual borders. Something’s compressed. Stand up, walk away, come back in an hour or tomorrow.
- Dropped tool. One dropped tool is a bad grip. Two is a warning. Three, and you’re finished for the day. That’s a rule I actually follow.
- Blurry vision. Fatigue. Stop.
- Any near-miss with a rotary cutter, iron, or needle. One is enough. Put the tool down, take a real break, and don’t come back until you’re steady.
End the session with something restorative for your hands. Warm water, a hand cream you like, gentle self-massage of the palm and each finger. A short end-of-day massage routine takes ten minutes and can settle down the nerve chatter that otherwise keeps you awake at night.
You won’t get every session right. I still don’t. Build the awareness that catches you before a small overreach becomes a three-day flare-up.
Frequently Asked Questions
Can I still hand-quilt if my fingers are numb?
Yes — but the tool choices matter more than they did before. A rubber finger-tip (the kind bank tellers use for counting) on your pushing finger and a metal thimble on your under-finger let you feel the needle through touch you can trust. A shorter needle is easier to control. Keep sessions short and stop the moment you can’t feel where the needle is.
Are electric scissors worth it?
For many neuropathy sewers, absolutely. Single button press, very light, no grip strength required. Not a fit for tiny detail cuts, but for long straight cuts on light-to-medium fabrics they’re a genuine gift. Rechargeable models are the ones to look at — the corded ones are clunky.
What if I’ve already dropped a rotary cutter and I’m scared of it now?
That fear is a good instinct. Switch to a rotary cutter with a squeeze-to-open blade (it closes the instant your hand relaxes), practice on scrap for a week before you cut anything you care about, and consider a Kevlar glove for the ruler hand. Some quilters also make friends with a good pair of shears again — there’s no rule that you must use a rotary cutter.
How do I stop cramping in my hands at the end of a sewing day?
Cramping usually means you sewed longer than your hands wanted, gripped harder than you needed to, or worked in a cold room. Shorten the session, add breaks, put on fingerless compression gloves earlier, and warm the room a few degrees. A warm-water hand soak at the end helps a lot. If the cramps happen every session no matter what you try, that’s a conversation to bring to your doctor.
Is quilting bad for carpal tunnel?
Only when done badly. Prolonged wrist-flexed positions over a rotary cutter, hunched shoulders over a low machine, and squeezing scissors with a tight fist are all things that irritate the median nerve. Fix your ergonomics — table height, chair, wrist position, tool choice — and the hobby itself is not the problem. If you have a diagnosed case, please loop in your hand therapist on any changes.
What’s the single best tool I should buy first?
An ergonomic rotary cutter with a safety lock, and behind it, a pair of spring-loaded scissors. Those two purchases together cost less than a nice piece of yardage and they solve the two biggest hand-strain and hand-injury risks at your table. After that, a good LED task lamp is the next best dollar you’ll spend.
How do I know if my hobby is making my neuropathy worse rather than better?
Watch the days after a sewing session, not just the session itself. If you’re sore for hours after and back to normal the next morning, you’re in the right zone. If you’re still hurting two or three days later, you overdid it — shorten the next session, add a rest day, and rework your ergonomics. And if pain, numbness, or weakness are getting steadily worse over weeks rather than session-by-session, that’s a signal to bring to your neurologist. The hobby did not cause the neuropathy. But the neuropathy needs to be understood at that level of change.
About the Author