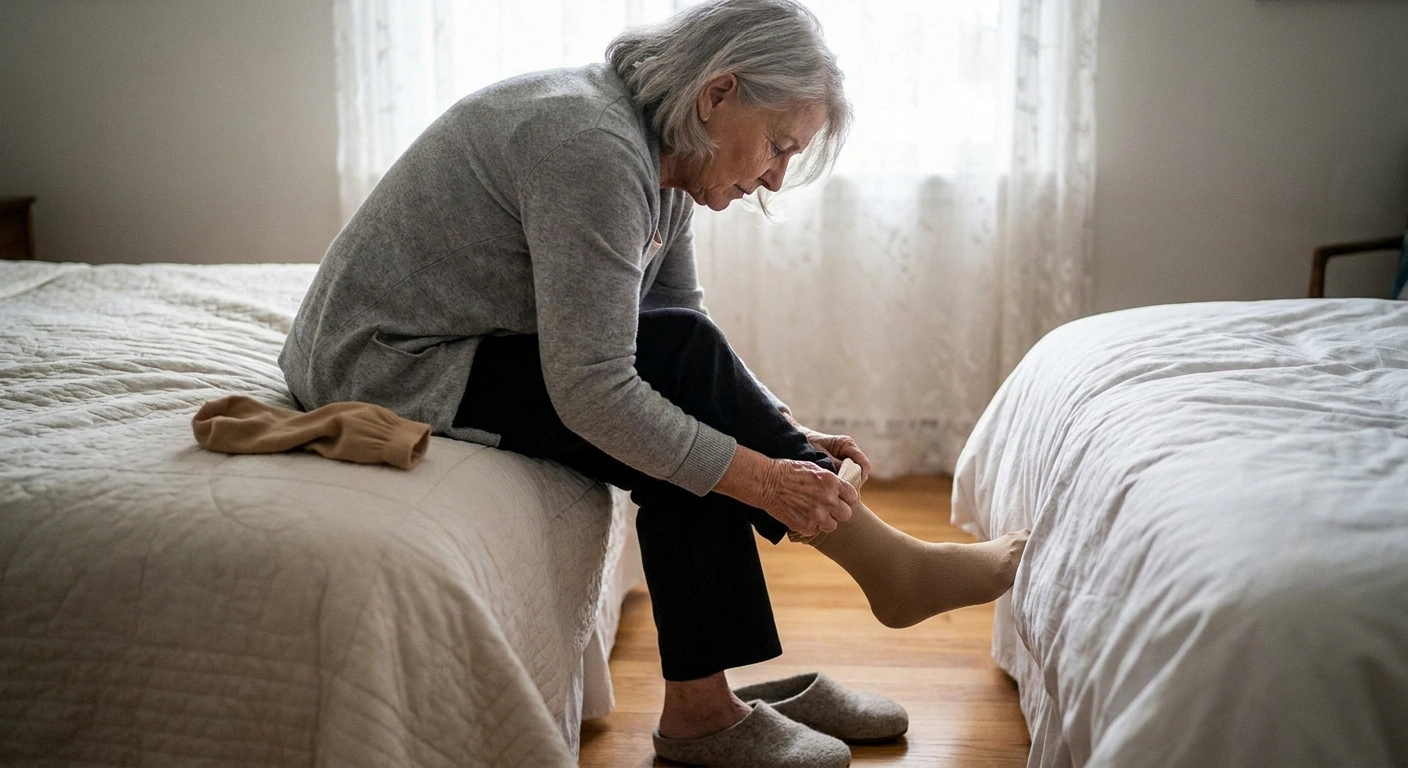
You’re sitting on the edge of the bed with a compression sock stretched over your toes, and it will not go any further. Your fingers are cramping. You’re bent forward far enough that your back has opinions. The sock has bunched into a tight roll at the arch of your foot and every pull makes the roll tighter.
Ten minutes in, you take it off, put on a regular sock, and decide the doctor didn’t really mean every day.
This happens constantly, and it’s almost never a strength problem. It’s a sequence problem. The standard instructions were written for people with working hands and normal sensation, and they leave out the three things that actually decide whether this goes smoothly: when you do it, how you fold the sock before your foot goes near it, and what’s on your hands.
Get those right and the whole business takes about ninety seconds a leg. Here’s the version I wish someone had shown me.
Timing Does More Work Than Technique
If you change one thing, change when.
Put them on first thing in the morning, before your feet touch the floor. Not after coffee. Not after the bathroom. Before you stand up.
You’ve been lying flat all night, and gravity hasn’t been pulling fluid down into your feet and ankles for seven or eight hours. Your legs are at their smallest measurement of the entire day, and that measurement starts changing the moment you stand. Fifteen minutes upright and you’re already fighting a slightly larger leg. An hour of puttering around the kitchen and you’re trying to fit yesterday’s sock onto a foot that’s grown.
This is standard advice from vein specialists and it’s the most reliable tip in the whole category — but it usually appears as step seven on a list where nobody notices it. It belongs at the top.
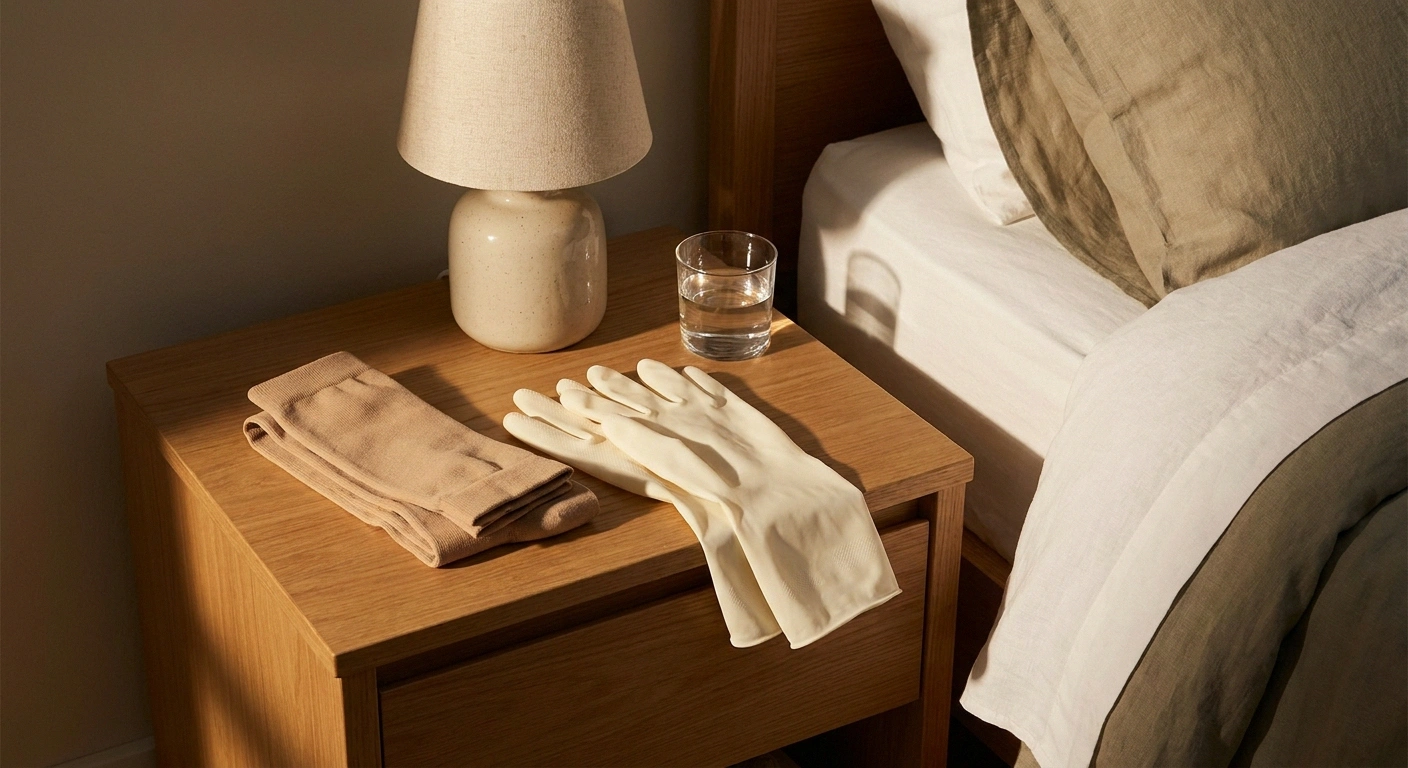
Practical setup: keep the socks on the nightstand, not in a drawer across the room. Anything that requires standing up first defeats the point.
One more thing before you start — your skin has to be completely dry. Damp skin grabs the fabric and stops it dead. If lotion is part of your foot care routine, and it should be, move it to bedtime so it’s fully absorbed by morning.
The Fold That Changes Everything
Most people put a compression sock on the way they’d put on a regular sock: gather it up, aim the toes, pull. With a firm compression garment, that’s what produces the bunched roll at the arch.
Order matters more than effort here. Steps one and two are done before you touch the sock, and they remove most of the difficulty the other steps would otherwise have to fight.
- Wake up. Do not stand.
- Check the skin is dry. Lotion belongs to last night.
- Rubber gloves on.
- Hand inside the sock, pinch the heel, pull it back out over your hand.
- Foot into the pocket, toes first. Seat the heel before anything else.
- Roll upward with both hands, alternating sides. Never pull the cuff.
- Flat palm over the whole thing, toes to calf.
- Shoes. Toe colour check in twenty minutes.
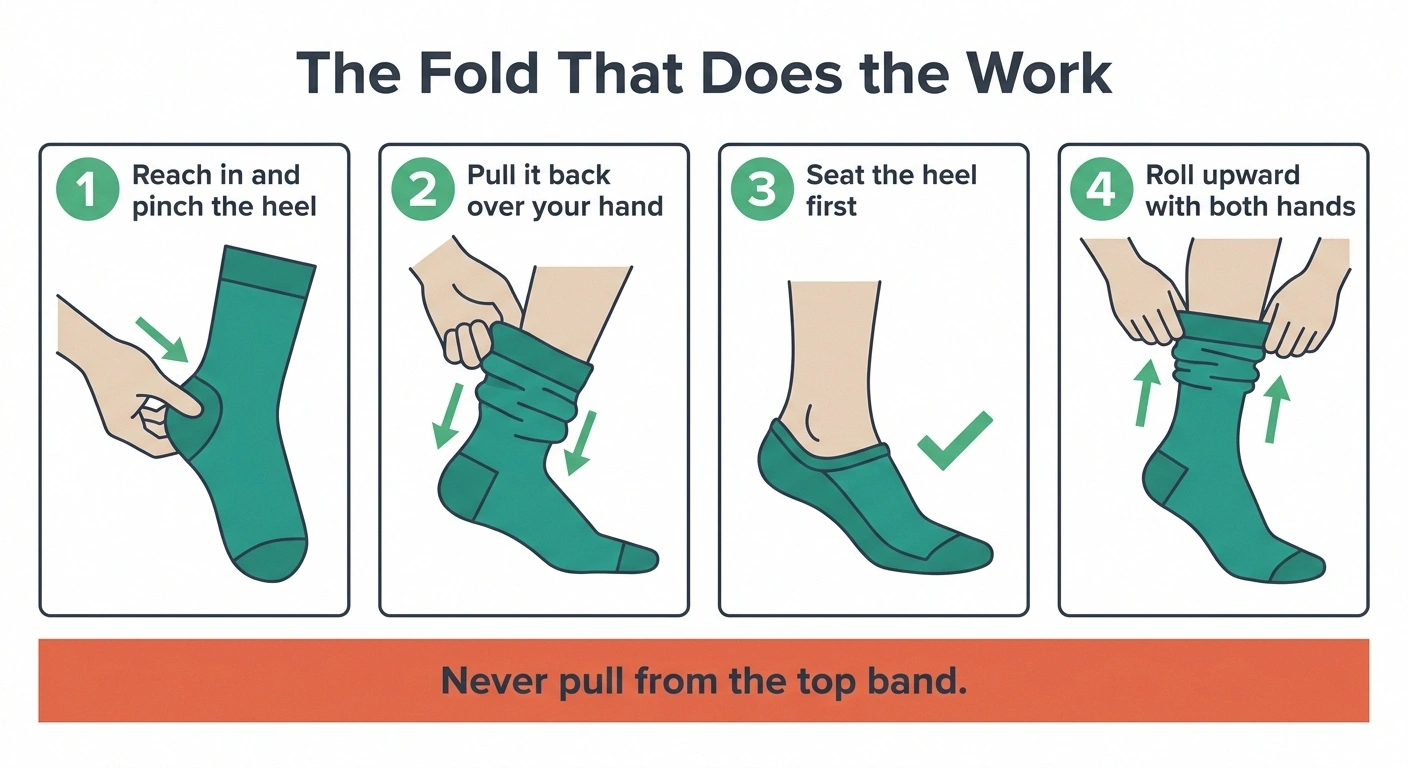
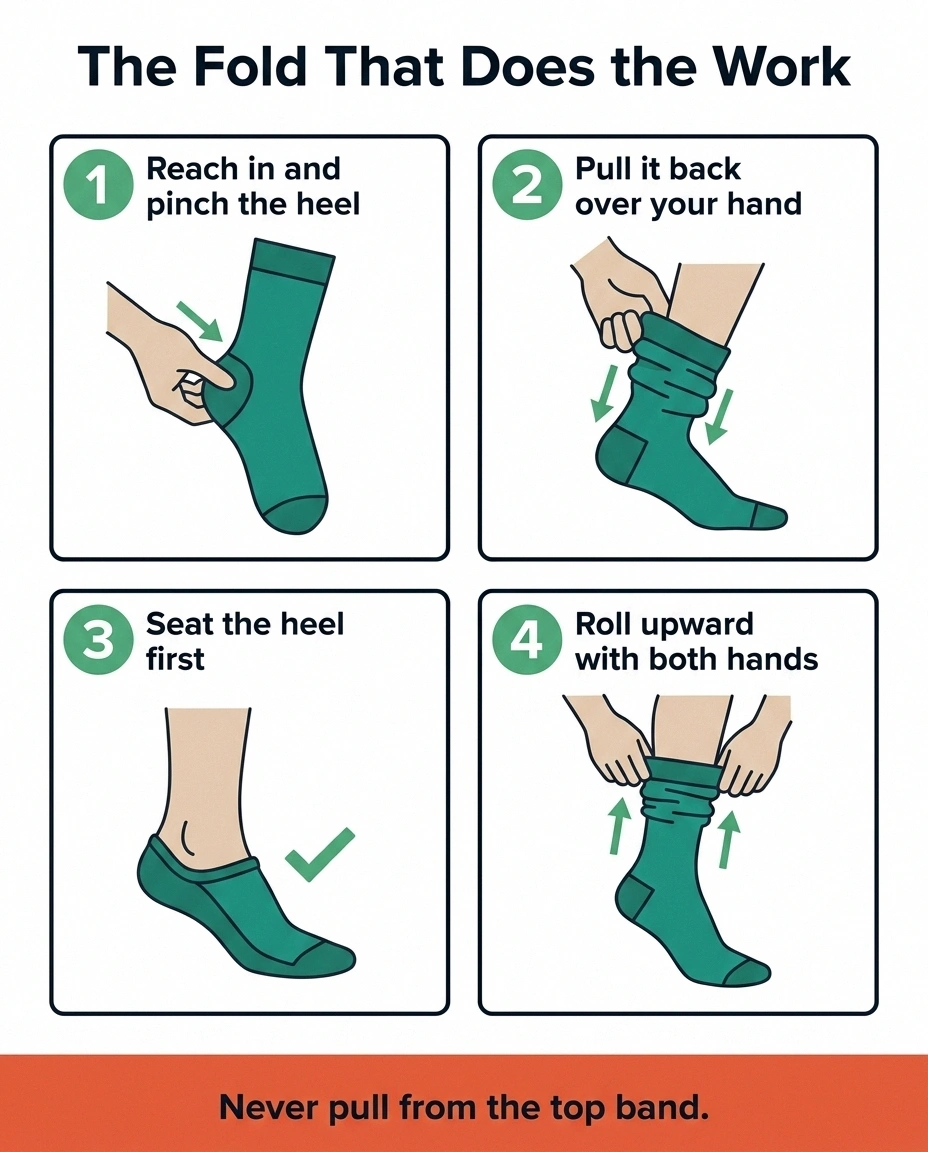
The technique that works turns the sock partly inside out first, so you’re never pulling through the whole length of it.
Step one. Reach your hand down inside the sock all the way to the heel, and pinch the heel pocket between your fingers. Your hand is in there like a puppet.
Step two. Holding on to that heel, pull the sock back out over your hand so it turns inside out down to the heel. What you end up with is a short foot-shaped pocket with the leg portion gathered behind it, instead of a long tube.
Step three. Work that foot pocket onto your foot. Toes first, then get the heel seated properly in the heel pocket before you do anything else. This is the step people rush, and everything downstream depends on it. If the heel is in the wrong place, the sock will fight you the whole way up and end up crooked.
Step four. Roll or unfold the leg portion upward, working with both hands from the ankle up, smoothing as you go. Small movements, alternating sides.
The one thing to never do: grab the top band and haul. It stretches out the cuff, which is the part holding the whole thing in place, and it wrecks the graduated pressure the sock was engineered to deliver. It also puts the entire job on your fingers, which is exactly where you have the least to give.
Rubber Gloves Are the Cheapest Fix Available
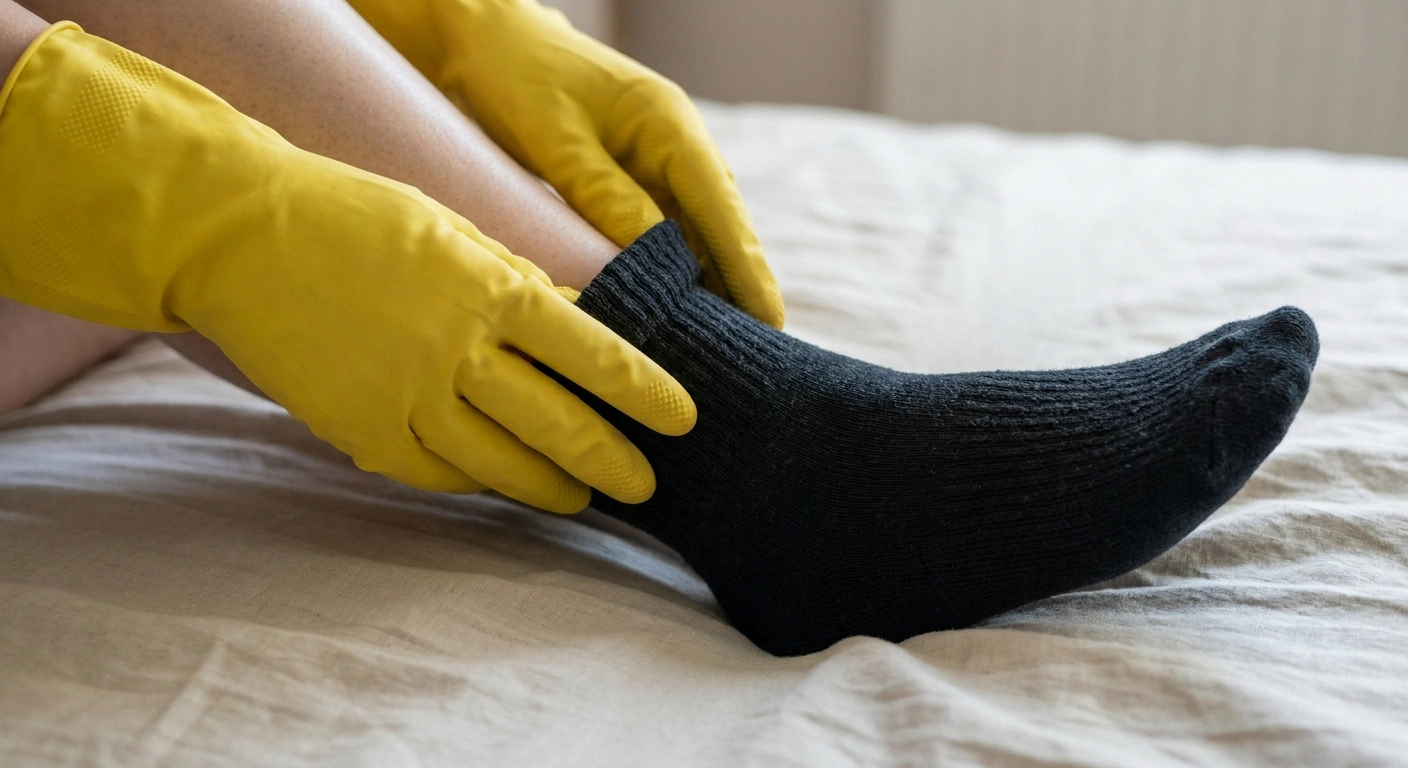
A pair of household rubber gloves costs a few dollars and solves more of this problem than any other single item.
Grip is the actual bottleneck — not strength. Compression fabric is slick, your fingers slide, and you compensate by squeezing harder, which is what makes your hands ache and what makes people give up. Rubber gloves let the fabric stay put under light pressure, so you can push and roll rather than pinch and pull.
They also protect the sock. Fingernails snag compression knit easily, and a snag becomes a run, and a run ends a sock that cost thirty dollars.
Purpose-made donning gloves exist and they’re good, with textured palms and a better fit. Kitchen gloves from the grocery store do most of the same work. Either way, this is the first thing to try before spending real money on a device, and it’s the tip most people have never been given.
Aids, Sorted by the Problem They Solve
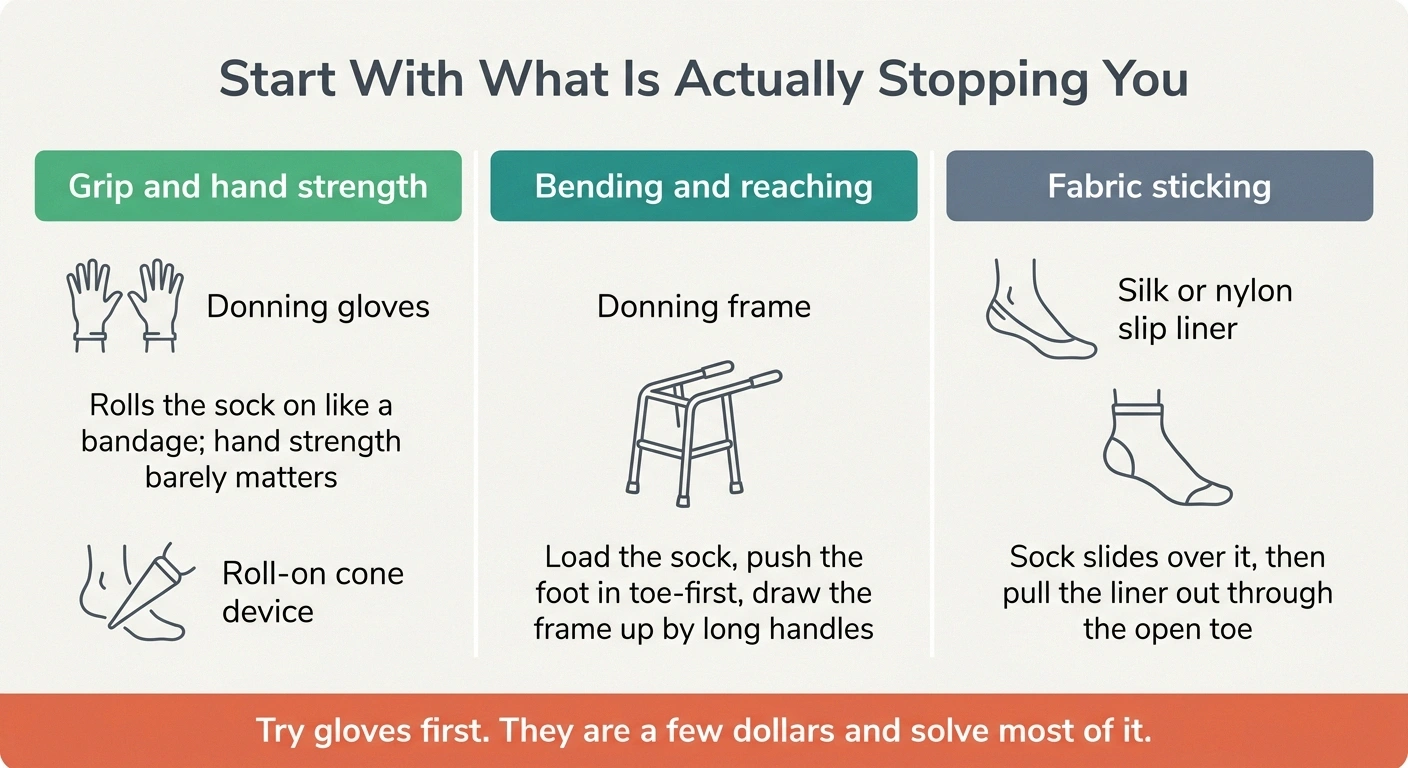
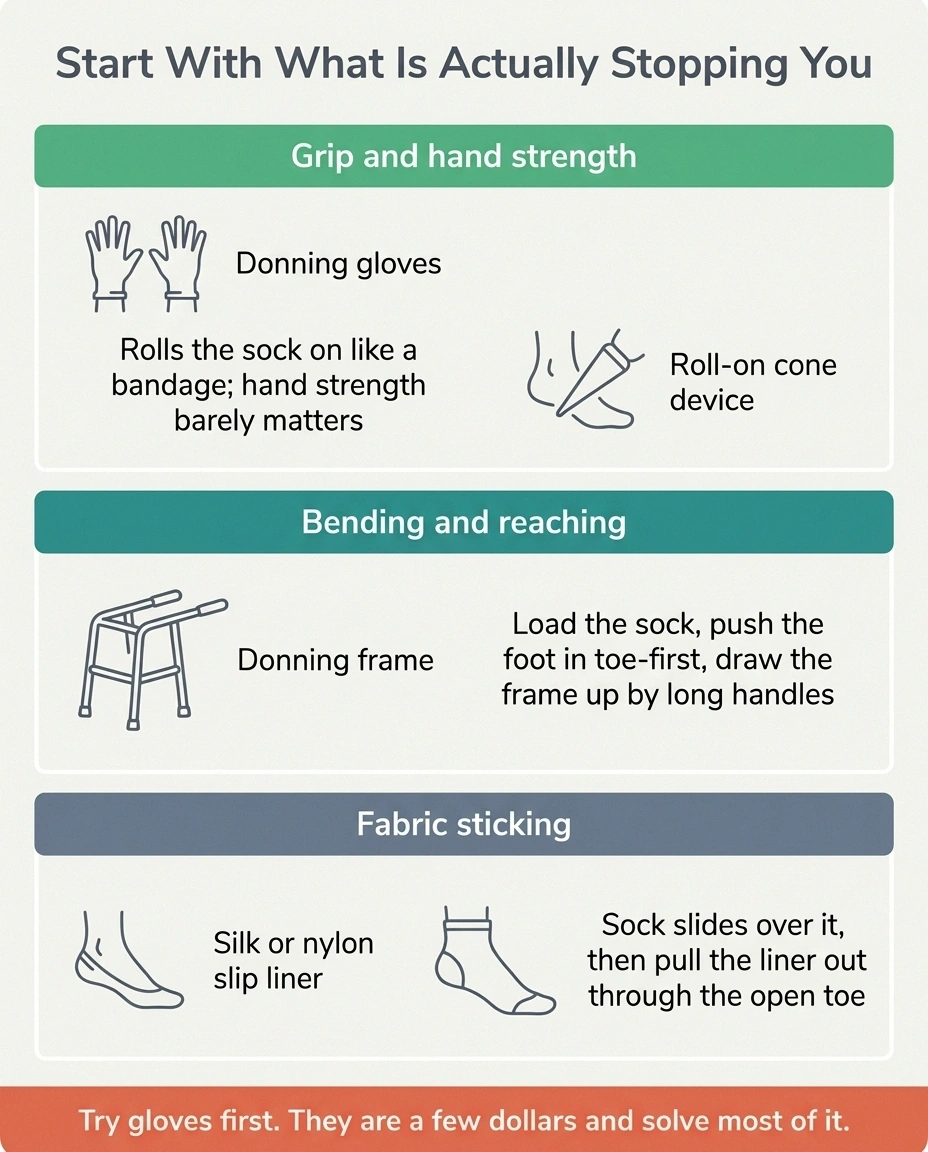
Product lists for this are usually ranked by price. More useful to sort them by which specific thing is stopping you.
Most people who buy a device first discover the gloves would have been enough. Work down this list and stop when the problem stops.
| Try | Fixes | Does not fix |
|---|---|---|
| 1. Rubber or donning gloves | Grip, snagged fabric, sore fingers | Bending, reaching |
| 2. Slip or liner | Fabric catching on dry skin | Hand strength |
| 3. Roll-on cone | Hand strength almost entirely | Reaching your feet |
| 4. Donning frame | Bending and gripping together | Storage space |
| Basic cord sock aid | Regular socks | Often too flimsy for firm compression |
If the problem is grip and hand strength: donning gloves, as above. If that isn’t enough, a roll-on cone device. The sock gets rolled onto a cone, then the cone rolls it onto your leg the way you’d roll a bandage. Hand strength barely enters into it.
If the problem is bending or reaching: a donning frame. The sock loads onto a frame inside out, you push your foot in toe-first, then draw the frame up your leg with long handles. No bending at the hip, no reaching past your knee. This is the right tool if hips, back, or belly are what stand between you and your feet.
If the problem is both: the frame-style aids generally handle both at once, since they remove the bending and take most of the gripping out of it too.
If the problem is the fabric sticking: a slip or liner. It’s a slick nylon or silk sleeve that goes over your foot first; the sock slides over it, and then you pull the liner out through the open toe. Some brands include one in the box. Check before you buy a separate one.
Two honest cautions. Those simple plastic sock aids with the cord handles, the ones you see in every senior-care catalog, are built for regular socks and often aren’t rigid enough for firm compression. Look specifically for one rated for compression garments. And zippered compression socks are appealing, but the zipper is a hard ridge sitting against skin that may not register pressure — so the skin under that seam earns a closer look each evening than a plain sock would need.
Run Your Hand Over It Before You Stand Up
This is the step that isn’t on any of the standard instruction sheets, and for us it’s the one that matters most.
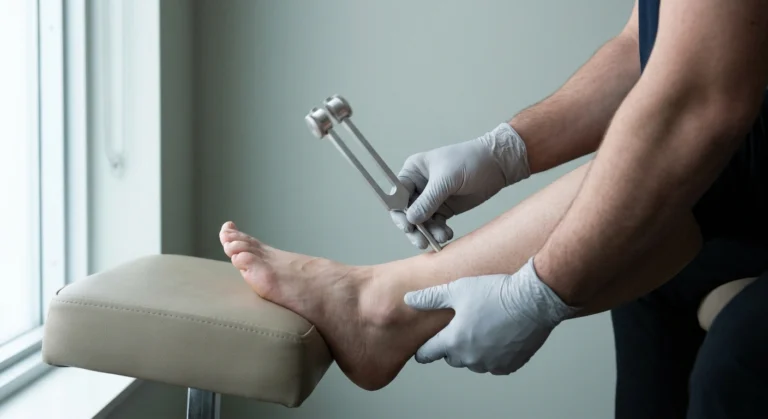
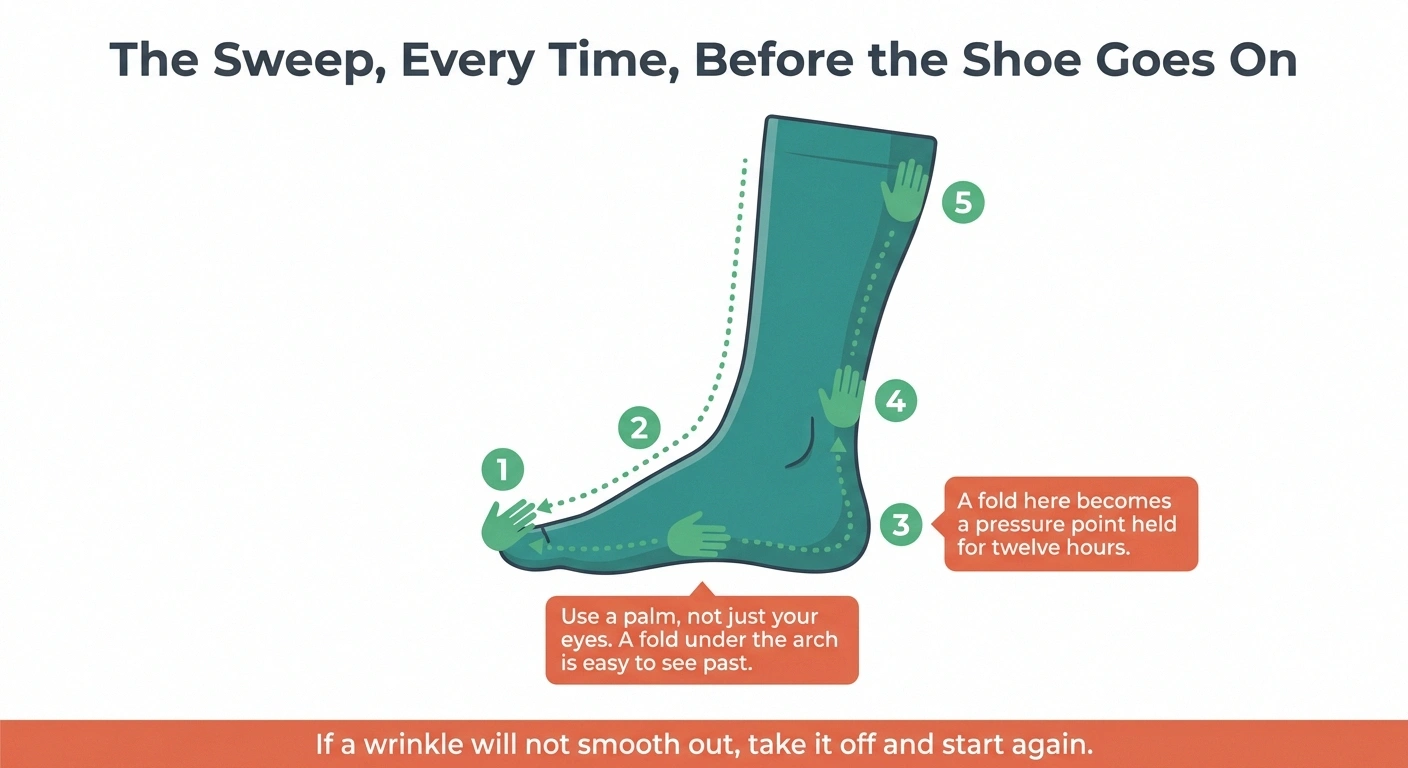
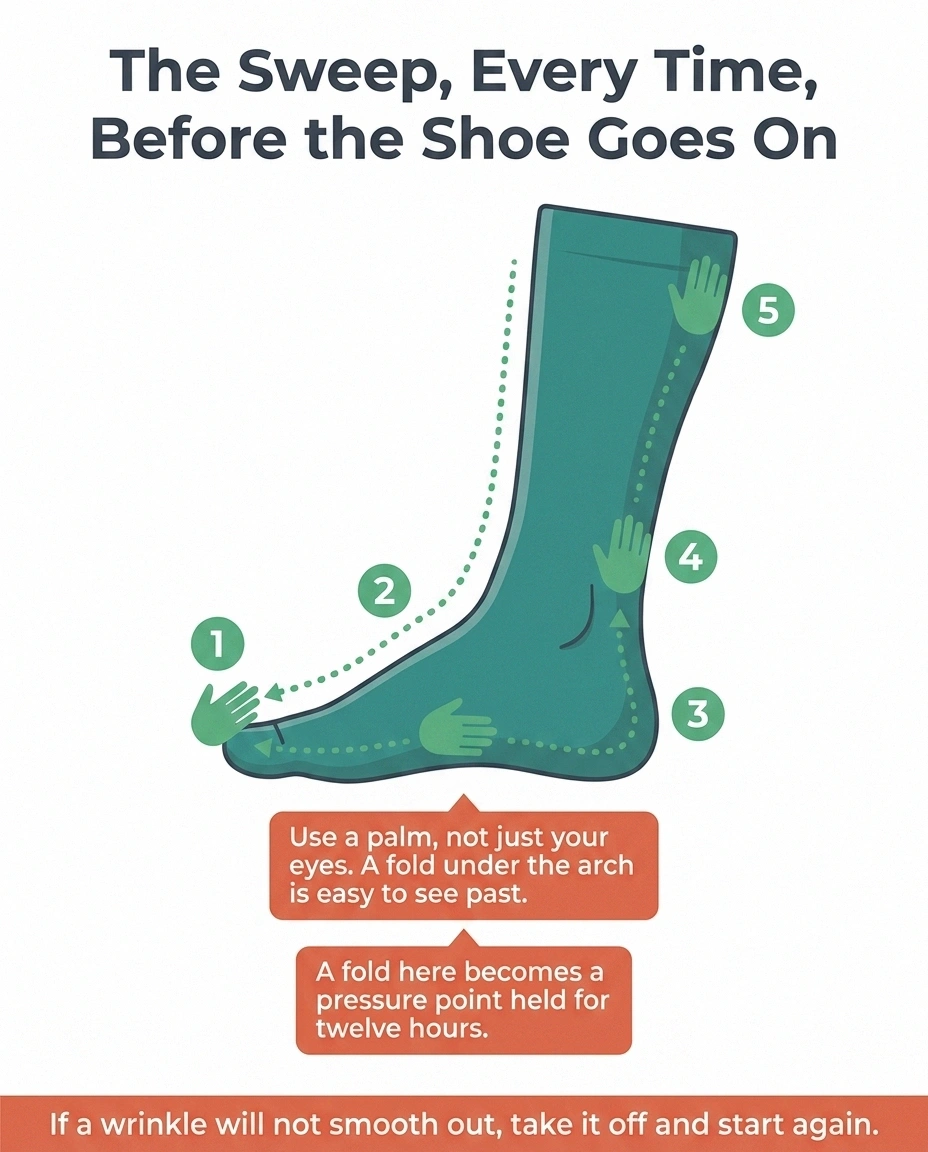
Before your foot goes into a shoe, run a flat palm slowly over the whole sock: toes, over the top of the foot, around the heel, up the ankle, along the calf. You’re feeling for a wrinkle, a fold, a bunched ridge, or a seam that’s rotated out of position.
Why this earns a section of its own: a fold of fabric under a foot that can’t feel it becomes a focal pressure point, held against the same square inch of skin for twelve hours, inside a shoe, under your full body weight. That’s a recipe for a pressure sore, and on a numb foot you get no warning while it forms. A sock with a wrinkle in it is worse than no sock at all.
Use your hand rather than your eyes alone, because a fold under the arch is easy to miss visually and obvious to a palm. If a wrinkle won’t smooth out, take the sock off and start again. Two minutes now against a wound that takes months.
The same logic runs through everything in daily foot care with reduced sensation: you replace the warning system you’ve lost with a habit you perform on schedule.
You Can’t Feel Too Tight, So Look Instead
Normally your body tells you a sock is too tight. With neuropathy that signal is unreliable or gone, so comfort is no longer evidence of anything. A sock that feels fine may be too tight, and a sock that feels tight may be exactly right.
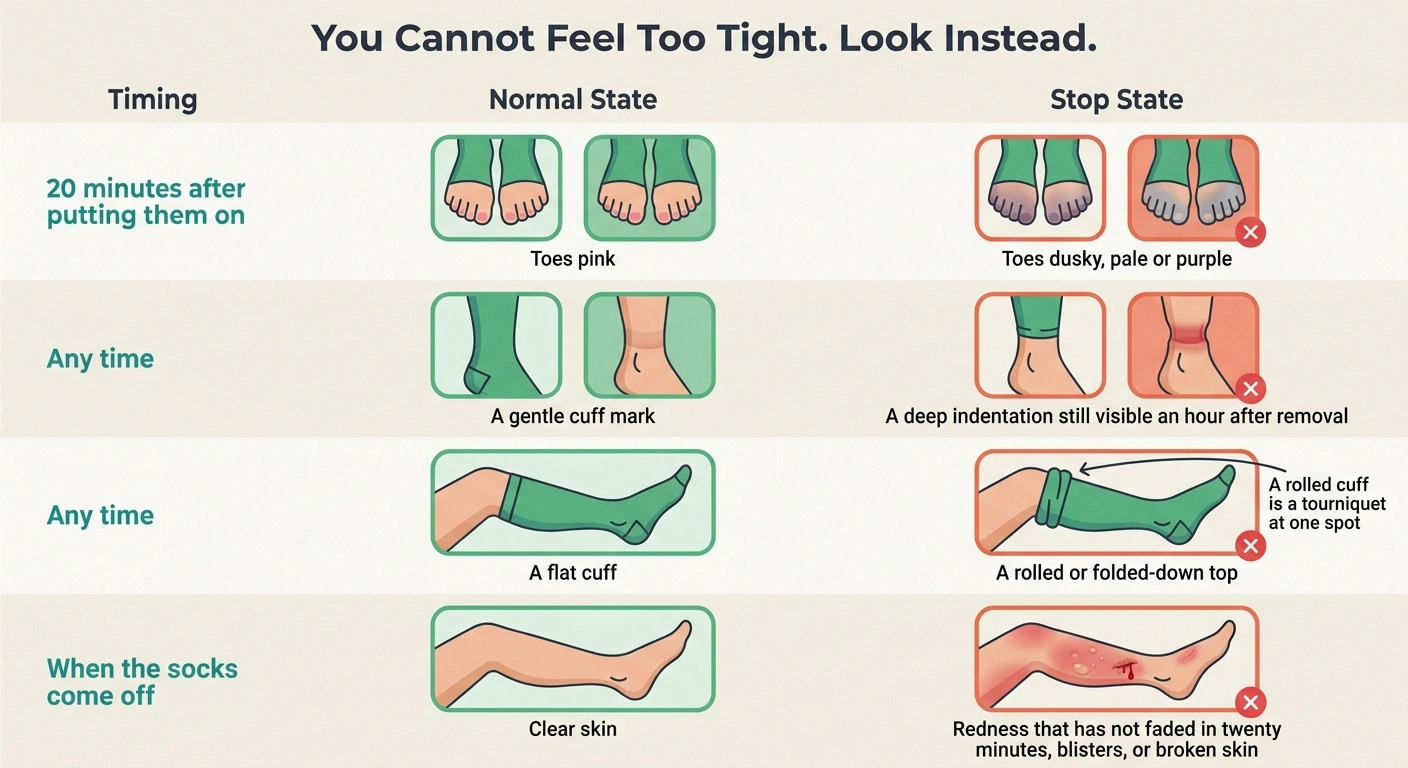
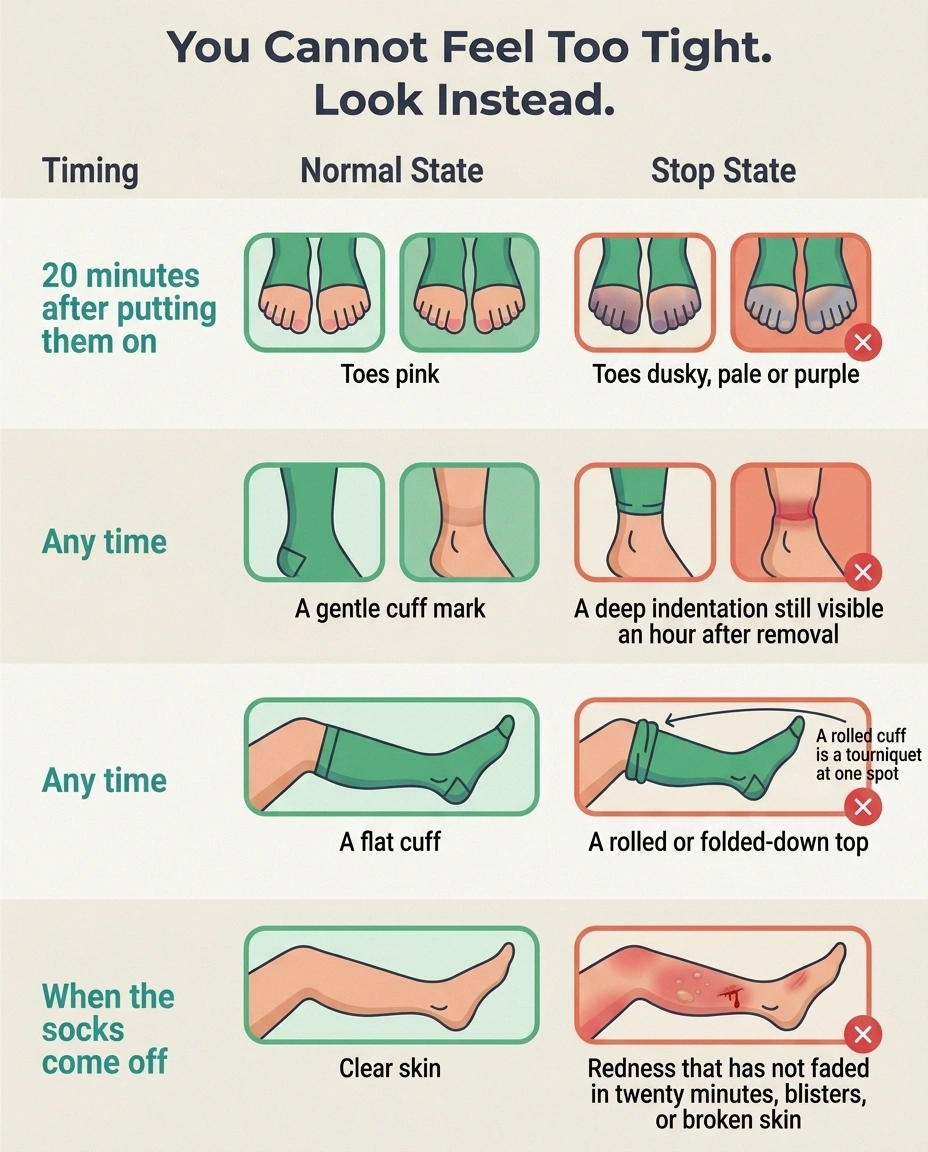
Sensation cannot tell you when something is wrong here, so these are the visual signals that replace it. Any one of them means the socks come off before you go anywhere.
- Toes that look dusky, purple, pale or white twenty minutes in
- A cuff indentation still clearly visible an hour after removal
- A cuff that has rolled or folded down on itself
- Redness that has not faded within about twenty minutes of the sock coming off
- Any blister, broken skin, or damp patch on the sock
- A wrinkle you could not smooth out and wore anyway
A small foot wound found on day one is a different problem from the same wound found on day ten. That gap is the entire reason these checks are on a schedule rather than left to how things feel.
Check with your eyes, on a schedule.
Toe color. Look at your toes twenty minutes after putting the socks on. Pink is fine. Dusky, purple, pale, or white is not, and the socks come off.
The cuff line. A gentle mark where the band sits is normal. A deep indentation, or one that’s still clearly visible an hour after removal, means the top is too tight or has rolled.
Rolled or folded-down tops. A rolled cuff turns into a tourniquet at exactly one spot. If a sock keeps rolling, it doesn’t fit, and the answer is a different size rather than a daily fight.
Skin at removal. This is where the day’s damage shows. Look for redness that doesn’t fade within about twenty minutes, blisters, or any broken skin — this pairs naturally with the two-minute foot check you’re ideally already doing at night.
If you find something and you’re not sure what it is, that’s the moment to have it looked at rather than to watch it for a week. Small foot wounds are much easier to deal with early, and that’s true for everyone but especially with reduced sensation.
Getting Them Off
Removal gets skipped by nearly every guide, and it has its own trick.
Don’t pinch the top band and peel. That’s slow, it’s hard on fingers, and it stretches out the part of the sock you most need to keep its shape.
Instead, hook your fingers or thumbs inside the top band on both sides and push down, rolling the sock in on itself as it descends. It turns partly inside out on the way, which is exactly what you want, since that’s roughly the shape you’ll want it in tomorrow morning anyway. Once it reaches the ankle, work it over the heel and off the toes.
If hand strength is the issue here too, the same roll-on cones work in reverse, and rubber gloves help just as much coming off as going on. If your hands are the harder problem generally, neuropathy in the hands has more on grip, and compression gloves raise the same donning questions one size up.
When Compression Isn’t the Right Answer
Everything above assumes compression socks are appropriate for you, and they aren’t for everyone.
- mmHg
- Millimetres of mercury, the pressure the sock applies at the ankle. The range printed on the package is the compression class, and it is the number that matters.
- 15-20, 20-30, 30-40
- Meaningfully different products, not sizes of the same idea. Going up a class is a clinical decision, not a shelf preference, and a higher class is not a stronger version of the same recommendation.
- Graduated
- Tightest at the ankle, easing as it goes up the leg. This is why hauling on the cuff matters: stretching the top out flattens the gradient the sock was built around.
- Knee-high, thigh-high, waist
- Length is chosen for where the swelling is, not for preference. Most neuropathy-related recommendations stop at knee-high, which is also by far the easiest to get on.
If nobody specified a class for you and you picked one off a shelf, that is worth raising, particularly if circulation in your legs has ever been questioned.
Firm compression can cause harm when arterial circulation is already poor. Peripheral artery disease is common in exactly the population that has neuropathy — diabetes drives both — and squeezing a leg that’s struggling to get blood in is a different proposition from squeezing one that’s struggling to send fluid back out. Reduced sensation on top of poor arterial flow is the combination that most deserves a professional opinion rather than a guess.
Compression class also isn’t a shelf decision. The numbers on the package are millimeters of mercury, and 15-20 versus 20-30 versus 30-40 are meaningfully different products. That’s a prescription-level choice, not a preference.
An open wound, a new or worsening swollen leg, or significant heart failure all change the calculation too.
If you’re unsure why these were recommended in the first place, our page on swelling with neuropathy covers what compression is actually for, and whether compression socks help neuropathy takes on the evidence question directly. For the sock itself rather than the compression, the sock selection guide covers seams, fibers, and fit.
The Short Version
Socks on the nightstand. Put them on before your feet hit the floor, on dry skin. Turn the sock inside out to the heel first, seat the heel, then roll upward. Wear rubber gloves. Never pull from the cuff. Run a flat palm over the whole thing before your shoe goes on. Check your toe color twenty minutes later, and check your skin when they come off.
That’s it. Once the sequence is habit it stops being a fight, and the socks stop living in a drawer. It slots neatly into a morning routine alongside the rest of the day’s first ten minutes, and it belongs in the same mental drawer as every other adaptive dressing trick that turns a two-handed job into a one-handed one.
Frequently Asked Questions
What is the easiest way to put on compression socks?
Turn the sock inside out down to the heel first, so you have a short foot pocket rather than a long tube. Put your foot in, seat the heel in the heel pocket, then roll the leg portion upward with both hands. Do this first thing in the morning before standing up, on completely dry skin, wearing rubber gloves for grip. Those four things together solve the problem for most people without buying any device.
Should I put compression socks on before getting out of bed?
Yes, and it makes more difference than any other single change. After lying flat overnight your legs are at their smallest, because gravity has not been pulling fluid downward. Once you stand up, swelling begins accumulating immediately, and every minute upright makes the sock harder to get on. Keep them within reach of the bed so you are not tempted to stand first.
Do rubber gloves really help with compression socks?
They help a great deal. Grip is usually the limiting factor rather than strength, and rubber gloves let you push and roll the fabric with light pressure instead of pinching hard. They also prevent fingernails from snagging the knit, which is a common way expensive socks get ruined. Ordinary kitchen gloves work; purpose-made donning gloves fit better and last longer.
Why do my compression socks bunch up at the arch?
Almost always because the sock was pulled on as a full-length tube rather than turned inside out to the heel first, or because the heel was not seated in the heel pocket before the leg portion was rolled up. Both mistakes force the fabric to gather at the narrowest part of the foot. Start over with the inside-out method and get the heel positioned before anything else.
How do I know if my compression socks are too tight if I can’t feel my feet?
Look instead of relying on sensation. Check toe color about twenty minutes after putting them on, and take them off if your toes look dusky, purple, pale, or white. Check for a deep indentation at the cuff, especially one still visible an hour after removal. Examine the skin every time the socks come off, looking for redness that does not fade within about twenty minutes, blisters, or broken skin.
Can I sleep in compression socks?
Generally they are meant for daytime wear and come off at night, because lying flat does the work compression was doing while you were upright. Some conditions come with specific overnight instructions, so follow whatever guidance came with your prescription. What matters most with reduced sensation is that leaving them on around the clock removes the daily chance to inspect the skin underneath.
What is the best way to take compression socks off?
Hook your fingers or thumbs inside the top band on both sides and push downward, letting the sock roll in on itself as it goes rather than pinching and peeling from the top. Work it over the heel and off the toes once it reaches the ankle. Rolling protects the cuff, which holds the sock in place, and leaves it partly inside out and ready for the morning.
Are two thinner socks as good as one firm one?
Layering two lighter compression socks is a recognized approach and considerably easier to get on than a single firm garment, and the layers do add together. That addition is exactly why this is a question to put to whoever prescribed your compression rather than a change to make on your own. The aim is to reach the class you were already prescribed by an easier route, not to quietly exceed it, and with reduced sensation you would not feel a combination that turned out to be too tight. Two layers also mean more fabric to check for wrinkles, so the flat-palm check matters even more.
About the Author